Yesterday I crocheted the most adorable clutch. It pretty much took me all day, but it was definitely worth it. While teaching you how to make this clutch, you'll learn how to crochet the bobble stitch, how to attach a zipper to your crochet work and how to sew a lining into your crochet work. It's going to be a long post, but it's going to be fun. Let's give it a go, shall we? (Note: This project is not for beginners, so I'm not going to go into detail about beginner stitches and such.)
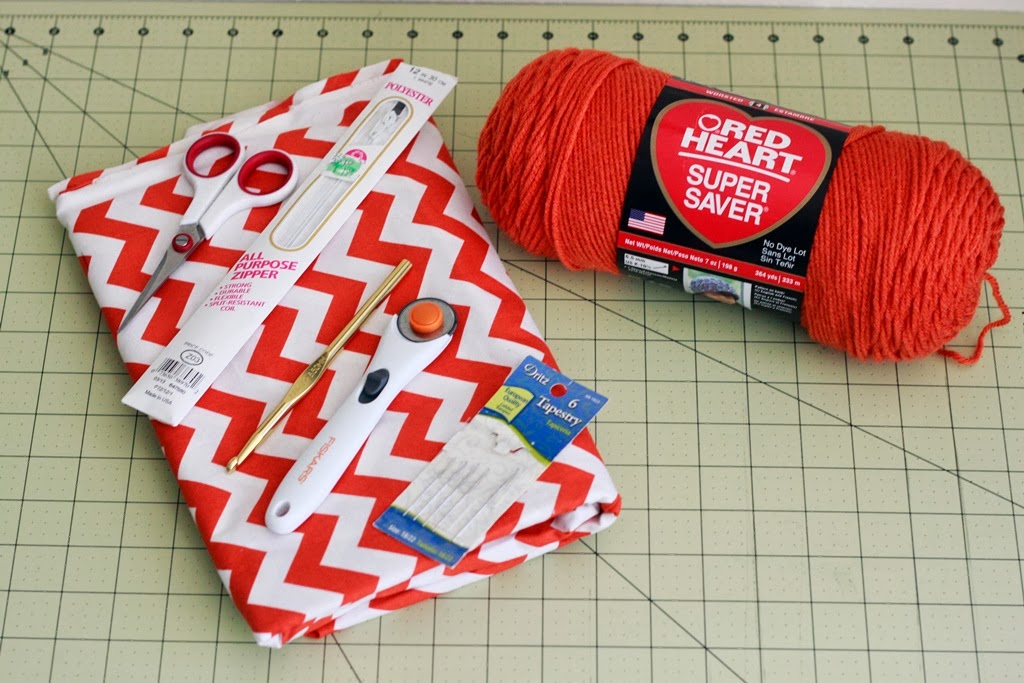
First let's gather the materials and supplies. You'll need your color choice of yarn, an embroidery/tapestry needle, a zipper, a crochet hook (I used a size G), scissors, a sewing machine, your choice of lining fabric and your color choice of thread. I also used a cutting mat and a rotary cutter, but those are optional.
Using your embroidery needle and yarn, sew along the side of a zipper using the blanket stitch. Try and make sure the stitches evenly spaced.
Do this to both sides of the zipper. Knot your ends. It's okay to leave them long because they'll be covered by the fabric lining later.
We're only going to be working on one side now,
so pick a side, any side!
Using a size G crochet hook, single crochet across the first row, chain one and turn your work.
Now we're going to learn the bobble stitch. It's quite obvious that I had already crocheted a few rows before taking pictures, but the concept is the same. After you've turned your work, single crochet in the first stitch.
Now:
1. Yarn over, insert your hook in the stitch, yarn over, draw up a loop.
2. Yarn over, draw through first two loops on the hook. You should have two loops on your hook now.
3. Yarn over, insert your hook in the stitch, yarn over, draw up a loop.
4. Yarn over, draw through first two loops on the hook. You should have three loops on your hook now.
5. Yarn over, insert your hook in the stitch, yarn over, draw up a loop.
6. Yarn over, draw through first two loops on the hook. You should have four loops on your hook now.
7. Yarn over, insert your hook in the stitch, yarn over, draw up a loop.
8. Yarn over, draw through first two loops on the hook. You should have five loops on your hook now.
9. Yarn over, draw through all five loops on hook.
10. Single crochet in the next stitch.
So on this row, you'll single crochet, bobble crochet, single crochet, bobble crochet, etc.
The bobble stitch will always be done on the back of your work. So this means that you'll have to alternate every row with a row of single crochet. So after you just finished these 10 steps on a whole row, you'll have to single crochet across the entire row. The bobble stitches may look longer than the single crochet stitches, but you still only need to single crochet into them once.
Below is one finished side of:
Row 1: SC in each stitch, chain one, turn.
Row 2: SC in first stitch, bobble in next stitch, repeat until end. Chain one, turn.
Row 3: SC in each stitch, chain one, turn.
Row 4: SC in first stitch, bobble in next stitch, repeat until end. Chain one, turn.
etc.
When you're finished, tie off your work.
Starting from one side to the other, single crochet across the edge.
Now do the same exact thing on the opposite side of the zipper.
Now place the right sides (bobble sides) together and single crochet around the edges. Make sure your zipper is open before you do so, because now you're going to turn the clutch inside-out.
Grab your lining fabric. Since my clutch is 7.5" x 5.25", I cut out a piece of fabric that was 9" x 12". The extra inches are for seam allowance. Mine was quite large, and you could definitely go smaller if you wanted to. Fold the fabric in half so it's 9" x 6".
Sew up the sides allowing enough seam allowance. Mine was .75" on each side.
Fold over the top as much as you need. You can check by placing it in the clutch and folding over accordingly. Now you don't have to do this part, but I did: sew across to make a hem.
You'll need to pin the lining to the clutch and thread a needle. The length of thread will need to be about three times the circumference of your clutch. Now's the tricky part. We're going to use the vertical "bars" that are sewn into the zipper to attach the lining to the clutch. Start on one seam/side of the bag and work your way around.
It's a little hard to see in the picture, but you'll need to knot your thread
below the top of the lining and then *ladder stitch the lining followed by making a stitch behind the vertical bar. After that, you'll repeat from the asterisk. This way the thread will be mostly hidden and completely hidden from the outside of the clutch. Knot your ends when you're done, and use a small crochet hook to pull them between the lining and the crochet to hide.
Beautiful, isn't it?
Perfect to use for small things or a smaller number of items, like a phone and some cash or small sewing supplies.
You could make similar clutches using different stitches. A single crochet would look nice.
If you're not so inclined to bobble stitching or hand sewing a lining, but you still have a need for this clutch, then no worries.
I have it for sale on my Etsy shop, Essential Handmades.
Have a happy week everybody!
And happy crocheting!
Liz


This is stunning! Off to pin! ^_^
ReplyDeleteThank you so much Leah!
DeleteLiz
This is absolutely adorable and perfect for a makeup bag or pencil case! :)
ReplyDeleteEmily
ahemitsemme.blogspot.com
Thank you Emily!
DeleteLiz
Wow!!! I am in no way able to make this myself, but I loved your post. I'm really into Pinterest these days, so I'm feeling inspired just by reading this.
ReplyDeleteI just found your blog, and now I'm following! I hope you check out my blog and follow back :)
xoxo Jackie
Something About That
Thank you so much for stopping by, Jackie! :) Off to read your blog!
DeleteLiz
Wow great job!! That would be the perfect bag to hold smaller items inside one of my gigantic purses!
ReplyDeletewww.amemoryofus.blogspot.com
Thanks Darcy!
DeleteLiz
That came out so wonderfully! I really love the color.
ReplyDeleteThank you so much Amanda!
DeleteLiz
holy moly, this is the cutest!!
ReplyDeleteThank you! I worked really hard on it!
DeleteLiz
I love this!!! Not only did you do yet ANOTHER cute stitch. But you turned it into something totally cute and use-able!!!
ReplyDeleteJust out of curiosity,Have you ever tried the crocodile stitch? Even though it was a bit tricky to learn, It's my favorite stitch!!!
If you want to take a look, or even try your hand at the crocodile stitch here's the best tutorial I've found!
http://www.youtube.com/watch/?v=RUNtrp_Vj4o
<3 summer
Thanks Summer! I have tried the crocodile stitch, I just don't know what to use it on!
DeleteLiz
so cute liz! thanks so much for stopping by....i love your blog!
ReplyDeleteMolly {Dreams in HD}
http://www.dreamsinhd.blogspot.com
Thanks Molly!
DeleteLiz
Oh my goodness, this is so adorable! Great job Liz!
ReplyDeleteThanks so much Emily!
DeleteLiz
My most favorite project you've done yet:) absolutely beautiful!! I love the color you chose as well. Nice job Liz! xo
ReplyDeleteThank you Sarah! I think it's my favorite too!
DeleteLiz
Love this! I have a question. After sewing the yarn onto the zipper, did you cut it off or use the same piece of yarn to start the first row?
ReplyDeleteYou can do it either way, if you want. I originally cut a long strand of yarn to sew onto my zipper and then cut off the excess. After that, I started with the ball of yarn to begin crocheting.
DeleteHappy crafting!
Liz
يمكنك زيارة موقع الالعاب فري العاب لتستمتع بالعديد من الاقسام مثل
ReplyDeleteتحميل الالعاب مجانا للهاتف
العاب مجانية
صب واي
العاب رائعة
بوكيمون
It looks good!!!
ReplyDeleteI am gonna try it, but could you tell me how long your zipper is??