
Yesterday, I posted about the camera pillow I made. I got enough requests for a tutorial so I made one! :)

What you'll need:
felt
scissors
thread
needle
sewing machine
button
I used the felt sheets you can get from just about any craft store. With two different colors, cut a strip of the one you'll use for the top, and cut the same amount off of the bottom piece. You do this so you'll end up with a rectangle-shaped camera. You will be making two of these dual-colored rectangles. One for the front; one for the back.

Pin and sew those babies together. Afterwards, open what you just sewed and sew a large zig-zag stitch with your sewing machine. Do this for both the front piece and back piece. Afterwards, place the back piece aside.

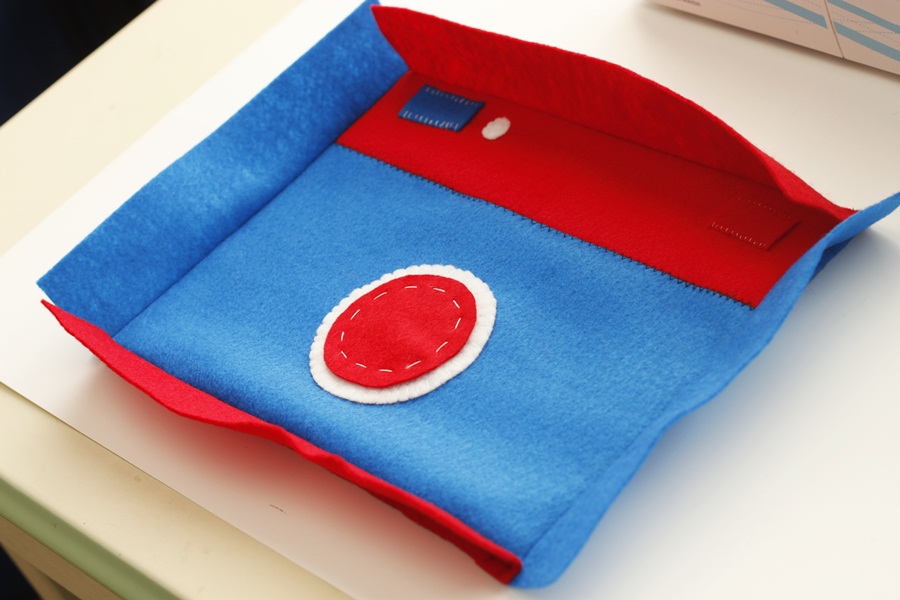
Cut out shapes. I cut out two similar-sized rectangles, one very small circle, one medium-sized circle and one large circle. I traced some glassware to get the circle perfectly round.

Hand stitch the pieces onto the felt.

Cut out four rectangles for the sides of the pillow.

Place right sides together, and sew on!
After you have all of the sides sewn on, sew the sides together like so.

Grab the back piece you set aside earlier. Place right sides together, pin and sew some more!

Leave a hole in the bottom of the pillow so you can stuff it.

Don't turn it inside-out just yet! This is the time to add a large button to act as the "shutter button."

Now turn the pillow inside-out and begin stuffing. After you think you've stuffed enough, stuff even more! (Excuse my pajama pants...)

Now it's time to hand stitch your seam closed. I use this method because it's hidden more than a whip stitch. Don't forget to pull tight!

Knot your ends and you're done!


Now you have a camera shaped pillow!
This pillow is now available in my Etsy shop, Essential Handmades. Check it out!

This pillow is now available in my Etsy shop, Essential Handmades. Check it out!

Love, Liz
Thanks for sharing how to do it!
ReplyDeleteJanine xx
BakeGlueandTrend
No problem!
DeleteLiz
I can't get over how cute these pillows are!
ReplyDeleteAwesome you made a tutorial!
ReplyDeleteGreat Job! You certainly have talent.
ReplyDeletexoxo
Juliette Laura
http://juliettelaura.blogspot.com
This is amazing! I really want to make it- a trip to the fabric shop is needed, I think...
ReplyDeleteKatie xx
http://gravityandshe.blogspot.co.uk
If you make it (and you totally should) you should definitely let me see it when you're done!
DeleteLiz
such a great idea! good job! Your blog is great <3
ReplyDeleteDo you want to follow each other? :)
http://fantasyfashioned.blogspot.de/
xx ♥
That's SOOOOOO so cute! I'm in love with your pillow - just adorable! : )
ReplyDelete-Mel the Crafty Scientist
this is so great, thank you for sharing! i might adapt the dimension into an ipad case. fun.
ReplyDeleteamanda
http://thingstoholdandstir.blogspot.com/
Oh that'd be adorable! You should let me know how it turns out!
DeleteLiz
your stitches are so clean! i would be worried that mine, even on the machine, would be so visibly wonky. great tutorial. i have so many friends that would love one of these for their birthdays.
ReplyDeletexo
writeslikeagirlblog.blogspot.com
I had to take out a few stitches on the first one, believe me!
DeleteLiz
I want my sewing machine to be less broken :\
ReplyDeleteI'm sorry. :/ I wish I could fix it!
DeleteLiz
Thanks for dropping by. Although, I'd have to say my life looks more like a train wreck at the moment ;)
ReplyDeleteI'm loving this diy pillow, and think it'd also make an adorable little bag for kids stuff!
Whaaaat this is awesome!
ReplyDeleteI wish I could sew but unfortunately even with the sewing machine it looks like a toddler did it ;)
Great blog by the way!
:)
Hi Liz, thanks for dropping by my blog :) i wish i know how to sew. this is such a cool project!
ReplyDeleteI've always wanted a sewing machine, These crafts are beautiful x
ReplyDeleteThis is so adorable!! How creative!! Thanks for stopping by my blog earlier!!
ReplyDeleteJenna @ rainonatinroof.com
This is SO cute! Perfect for a kid's room. xo
ReplyDeletehttp://www.jenventure.blogspot.co.uk
Wow what a cute idea! x, Kat
ReplyDeletewww.loveandace.com
Lovely!♥
ReplyDeletexx
Discover my Stylish Confessions!
Discover my Stylish Confessions!
freaking adorable!!
ReplyDeleteTHIS IS ABSOLUTELY AMAZING! since you have are gifted in the creative department, do you think you could maybe make a tutorial on a creative idea to store makeup brushes? i have a couple on my counter, but i don't want them to lay there and get dirty!
ReplyDeleteHi Emily! I recently made a tutorial on a make-up basket. I made it out of newspaper, and I keep my brushes in a mason jar. http://liz-makes.blogspot.com/2013/01/liz-makes-newspaper-basket.html
DeleteSuper cute! :) love the boldness of the red and blue!
ReplyDeleteOh my this is beyond adorable :)) I'm so glad I stumbled upon your blog, it's so creative and cool :)
ReplyDeleteYou definitely have a new follower, if you want to, come and check out my blog, maybe we could follow each other :)
http://smilesnapsparkle.blogspot.com/
i love this! Such a cute idea!
ReplyDeleteCan I make this even if I dont have a sewing machine? Can everything be hand stitched?
ReplyDeletePin and sew those babies together. Afterwards, open what you just sewed and sew a large zig-zag stitch with your sewing machine.
ReplyDeleteI dont get what you mean by this can you please explain?